Measuring Circuits
In order to measure strain with a bonded resistance strain gage, it must be connected to an electric circuit that is capable of measuring the minute changes in resistance corresponding to strain. Strain gage transducers usually employ four strain gage elements electrically connected to form a Wheatstone bridge circuit (Figure 2-6).
A Wheatstone bridge is a divided bridge circuit used for the measurement of static or dynamic electrical resistance. The output voltage of the Wheatstone bridge is expressed in millivolts output per volt input. The Wheatstone circuit is also well suited for temperature compensation.
 |
| Figure 2-6: Wheatstone Bridge Circuit Schematic |
In Figure 2-6, if R1, R2, R3, and R4 are equal, and a voltage, VIN, is applied between points A and C, then the output between points B and D will show no potential difference. However, if R4 is changed to some value which does not equal R1, R2, and R3, the bridge will become unbalanced and a voltage will exist at the output terminals. In a so-called G-bridge configuration, the variable strain sensor has resistance Rg, while the other arms are fixed value resistors.
The sensor, however, can occupy one, two, or four arms of the bridge, depending on the application. The total strain, or output voltage of the circuit (VOUT) is equivalent to the difference between the voltage drop across R1 and R4, or Rg. This can also be written as:
![]()
For more detail, see Figure 2-6. The bridge is considered balanced when R1/R2 = Rg/R3 and, therefore, VOUT equals zero.
Any small change in the resistance of the sensing grid will throw the bridge out of balance, making it suitable for the detection of strain. When the bridge is set up so that Rg is the only active strain gage, a small change in Rg will result in an output voltage from the bridge. If the gage factor is GF, the strain measurement is related to the change in Rg as follows:
![]()
The number of active strain gages that should be connected to the bridge depends on the application. For example, it may be useful to connect gages that are on opposite sides of a beam, one in compression and the other in tension. In this arrangement, one can effectively double the bridge output for the same strain. In installations where all of the arms are connected to strain gages, temperature compensation is automatic, as resistance change due to temperature variations will be the same for all arms of the bridge.
In a four-element Wheatstone bridge, usually two gages are wired in compression and two in tension. For example, if R1 and R3 are in tension (positive) and R2 and R4 are in compression (negative), then the output will be proportional to the sum of all the strains measured separately. For gages located on adjacent legs, the bridge becomes unbalanced in proportion to the difference in strain. For gages on opposite legs, the bridge balances in proportion to the sum of the strains. Whether bending strain, axial strain, shear strain, or torsional strain is being measured, the strain gage arrangement will determine the relationship between the output and the type of strain being measured. As shown in Figure 2-6, if a positive tensile strain occurs on gages R2 and R3, and a negative strain is experienced by gages R1 and R4, the total output, VOUT, would be four times the resistance of a single gage.
 |
| Figure 2-7: Chevron Bridge Circuit Schematic |
The Chevron Bridge
The Chevron bridge is illustrated in Figure 2-7. It is a multiple channel arrangement that serves to compensate for the changes in bridge-arm resistances by periodically switching them. Here, the four channel positions are used to switch the digital voltmeter (DVM) between G-bridge (one active gage) and H-bridge (two active gages) configurations. The DVM measurement device always shares the power supply and an internal H-bridge. This arrangement is most popular for strain measurements on rotating machines, where it can reduce the number of slip rings required.
 |
| Figure 2-8: Four-Wire Ohm Circuit Schematic |
Four-Wire Ohm Circuit
Although the Wheatstone bridge is one of the most popular methods of measuring electrical resistance, other methods can also be used. The main advantage of a four-wire ohm circuit is that the lead wires do not affect the measurement because the voltage is detected directly across the strain gage element.
A four-wire ohm circuit installation might consist of a voltmeter, a current source, and four lead resistors, R1, in series with a gage resistor, Rg (Figure 2-8). The voltmeter is connected to the ohms sense terminals of the DVM, and the current source is connected to the ohms source terminals of the DVM. To measure the value of strain, a low current flow (typically one milliampere) is supplied to the circuit. While the voltmeter measures the voltage drop across Rg, the absolute resistance value is computed by the multimeter from the values of current and voltage.
The measurement is usually done by first measuring the value of gage resistance in an unstrained condition and then making a second measurement with strain applied. The difference in the measured gage resistances divided by the unstrained resistance gives a fractional value of the strain. This value is used with the gage factor (GF) to calculate strain.
The four-wire circuit is also suitable for automatic voltage offset compensation. The voltage is first measured when there is no current flow. This measured value is then subtracted from the voltage reading when current is flowing. The resulting voltage difference is then used to compute the gage resistance. Because of their sensitivity, four-wire strain gages are typically used to measure low frequency dynamic strains. When measuring higher frequency strains, the bridge output needs to be amplified. The same circuit also can be used with a semiconductor strain-gage sensor and high speed digital voltmeter. If the DVM sensitivity is 100 microvolts, the current source is 0.44 milliamperes, the strain-gage element resistance is 350 ohms and its gage factor is 100, the resolution of the measurement will be 6 microstrains.
 |
| Figure 2-9: Constant Current Circuit Schematic |
Constant Current Circuit
Resistance can be measured by exciting the bridge with either a constant voltage or a constant current source. Because R = V/I, if either V or I is held constant, the other will vary with the resistance. Both methods can be used.
While there is no theoretical advantage to using a constant current source (Figure 2-9) as compared to a constant voltage, in some cases the bridge output will be more linear in a constant current system. Also, if a constant current source is used, it eliminates the need to sense the voltage at the bridge; therefore, only two wires need to be connected to the strain gage element.
The constant current circuit is most effective when dynamic strain is being measured. This is because, if a dynamic force is causing a change in the resistance of the strain gage (Rg), one would measure the time varying component of the output (VOUT), whereas slowly changing effects such as changes in lead resistance due to temperature variations would be rejected. Using this configuration, temperature drifts become nearly negligible.
Quarter / Half Strain Gauge Circuit
If a strip of conductive metal is stretched, it will become skinnier and longer, both changes resulting in an increase of electrical resistance end-to-end. Conversely, if a strip of conductive metal is placed under compressive force (without buckling), it will broaden and shorten. If these stresses are kept within the elastic limit of the metal strip (so that the strip does not permanently deform), the strip can be used as a measuring element for physical force, the amount of applied force inferred from measuring its resistance.
Such a device is called a strain gauge. Strain gauges are frequently used in mechanical engineering research and development to measure the stresses generated by machinery. Aircraft component testing is one area of application, tiny strain-gauge strips glued to structural members, linkages, and any other critical component of an airframe to measure stress. Most strain gauges are smaller than a postage stamp, and they look something like this:
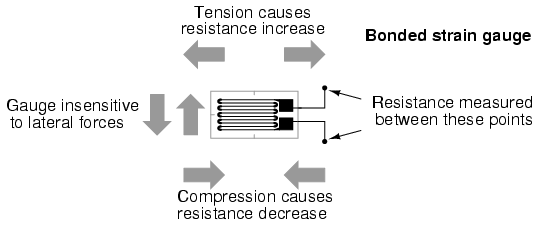
A strain gauge's conductors are very thin: if made of round wire, about 1/1000 inch in diameter. Alternatively, strain gauge conductors may be thin strips of metallic film deposited on a nonconducting substrate material called the carrier. The latter form of strain gauge is represented in the previous illustration. The name "bonded gauge" is given to strain gauges that are glued to a larger structure under stress (called the test specimen). The task of bonding strain gauges to test specimens may appear to be very simple, but it is not. "Gauging" is a craft in its own right, absolutely essential for obtaining accurate, stable strain measurements. It is also possible to use an unmounted gauge wire stretched between two mechanical points to measure tension, but this technique has its limitations.
Typical strain gauge resistances range from 30 Ω to 3 kΩ (unstressed). This resistance may change only a fraction of a percent for the full force range of the gauge, given the limitations imposed by the elastic limits of the gauge material and of the test specimen. Forces great enough to induce greater resistance changes would permanently deform the test specimen and/or the gauge conductors themselves, thus ruining the gauge as a measurement device. Thus, in order to use the strain gauge as a practical instrument, we must measure extremely small changes in resistance with high accuracy.
Such demanding precision calls for a bridge measurement circuit. Unlike the Wheatstone bridge shown in the last chapter using a null-balance detector and a human operator to maintain a state of balance, a strain gauge bridge circuit indicates measured strain by the degree of imbalance, and uses a precision voltmeter in the center of the bridge to provide an accurate measurement of that imbalance:
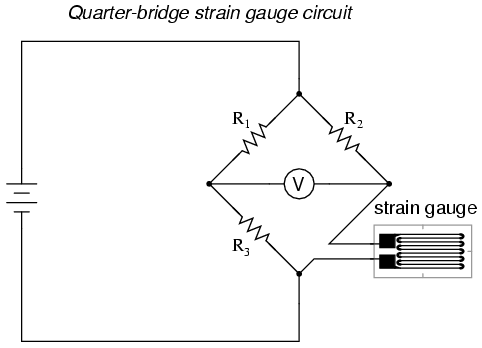
Typically, the rheostat arm of the bridge (R2 in the diagram) is set at a value equal to the strain gauge resistance with no force applied. The two ratio arms of the bridge (R1 and R3) are set equal to each other. Thus, with no force applied to the strain gauge, the bridge will be symmetrically balanced and the voltmeter will indicate zero volts, representing zero force on the strain gauge. As the strain gauge is either compressed or tensed, its resistance will decrease or increase, respectively, thus unbalancing the bridge and producing an indication at the voltmeter. This arrangement, with a single element of the bridge changing resistance in response to the measured variable (mechanical force), is known as a quarter-bridge circuit.
As the distance between the strain gauge and the three other resistances in the bridge circuit may be substantial, wire resistance has a significant impact on the operation of the circuit. To illustrate the effects of wire resistance, I'll show the same schematic diagram, but add two resistor symbols in series with the strain gauge to represent the wires:
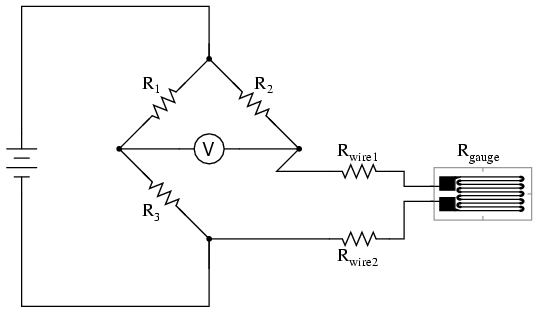
The strain gauge's resistance (Rgauge) is not the only resistance being measured: the wire resistances Rwire1 and Rwire2, being in series with Rgauge, also contribute to the resistance of the lower half of the rheostat arm of the bridge, and consequently contribute to the voltmeter's indication. This, of course, will be falsely interpreted by the meter as physical strain on the gauge.
While this effect cannot be completely eliminated in this configuration, it can be minimized with the addition of a third wire, connecting the right side of the voltmeter directly to the upper wire of the strain gauge:
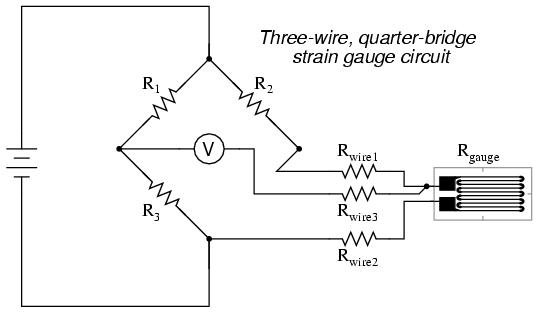
Because the third wire carries practically no current (due to the voltmeter's extremely high internal resistance), its resistance will not drop any substantial amount of voltage. Notice how the resistance of the top wire (Rwire1) has been "bypassed" now that the voltmeter connects directly to the top terminal of the strain gauge, leaving only the lower wire's resistance (Rwire2) to contribute any stray resistance in series with the gauge. Not a perfect solution, of course, but twice as good as the last circuit!
There is a way, however, to reduce wire resistance error far beyond the method just described, and also help mitigate another kind of measurement error due to temperature. An unfortunate characteristic of strain gauges is that of resistance change with changes in temperature. This is a property common to all conductors, some more than others. Thus, our quarter-bridge circuit as shown (either with two or with three wires connecting the gauge to the bridge) works as a thermometer just as well as it does a strain indicator. If all we want to do is measure strain, this is not good. We can transcend this problem, however, by using a "dummy" strain gauge in place of R2, so that both elements of the rheostat arm will change resistance in the same proportion when temperature changes, thus canceling the effects of temperature change:

Resistors R1 and R3 are of equal resistance value, and the strain gauges are identical to one another. With no applied force, the bridge should be in a perfectly balanced condition and the voltmeter should register 0 volts. Both gauges are bonded to the same test specimen, but only one is placed in a position and orientation so as to be exposed to physical strain (the active"dummy" gauge). If the temperature changes, both gauge resistances will change by the same percentage, and the bridge's state of balance will remain unaffected. Only a differential resistance (difference of resistance between the two strain gauges) produced by physical force on the test specimen can alter the balance of the bridge. gauge). The other gauge is isolated from all mechanical stress, and acts merely as a temperature compensation device (the
Wire resistance doesn't impact the accuracy of the circuit as much as before, because the wires connecting both strain gauges to the bridge are approximately equal length. Therefore, the upper and lower sections of the bridge's rheostat arm contain approximately the same amount of stray resistance, and their effects tend to cancel:

Even though there are now two strain gauges in the bridge circuit, only one is responsive to mechanical strain, and thus we would still refer to this arrangement as a quarter-bridge. However, if we were to take the upper strain gauge and position it so that it is exposed to the opposite force as the lower gauge (i.e. when the upper gauge is compressed, the lower gauge will be stretched, and vice versa), we will have both gauges responding to strain, and the bridge will be more responsive to applied force. This utilization is known as a half-bridge. Since both strain gauges will either increase or decrease resistance by the same proportion in response to changes in temperature, the effects of temperature change remain canceled and the circuit will suffer minimal temperature-induced measurement error:
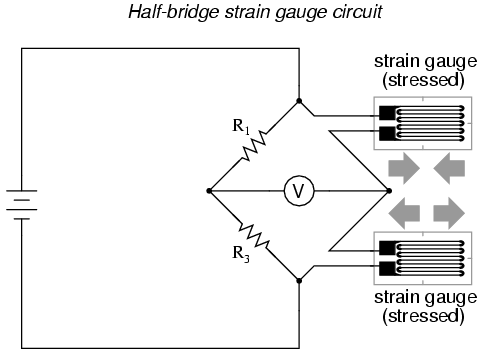
An example of how a pair of strain gauges may be bonded to a test specimen so as to yield this effect is illustrated here:

With no force applied to the test specimen, both strain gauges have equal resistance and the bridge circuit is balanced. However, when a downward force is applied to the free end of the specimen, it will bend downward, stretching gauge #1 and compressing gauge #2 at the same time:

In applications where such complementary pairs of strain gauges can be bonded to the test specimen, it may be advantageous to make all four elements of the bridge "active" for even greater sensitivity. This is called a full-bridge circuit:
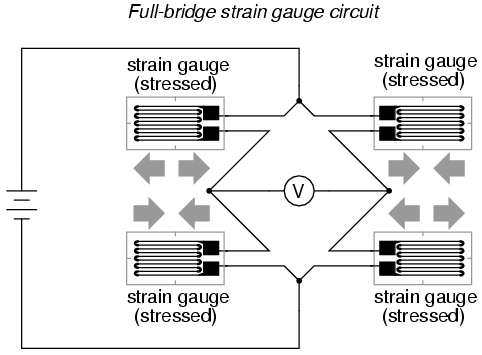
Both half-bridge and full-bridge configurations grant greater sensitivity over the quarter-bridge circuit, but often it is not possible to bond complementary pairs of strain gauges to the test specimen. Thus, the quarter-bridge circuit is frequently used in strain measurement systems.
When possible, the full-bridge configuration is the best to use. This is true not only because it is more sensitive than the others, but because it is linear while the others are not. Quarter-bridge and half-bridge circuits provide an output (imbalance) signal that is only approximately proportional to applied strain gauge force. Linearity, or proportionality, of these bridge circuits is best when the amount of resistance change due to applied force is very small compared to the nominal resistance of the gauge(s). With a full-bridge, however, the output voltage is directly proportional to applied force, with no approximation (provided that the change in resistance caused by the applied force is equal for all four strain gauges!).
Unlike the Wheatstone and Kelvin bridges, which provide measurement at a condition of perfect balance and therefore function irrespective of source voltage, the amount of source (or "excitation") voltage matters in an unbalanced bridge like this. Therefore, strain gauge bridges are rated in millivolts of imbalance produced per volt of excitation, per unit measure of force. A typical example for a strain gauge of the type used for measuring force in industrial environments is 15 mV/V at 1000 pounds. That is, at exactly 1000 pounds applied force (either compressive or tensile), the bridge will be unbalanced by 15 millivolts for every volt of excitation voltage. Again, such a figure is precise if the bridge circuit is full-active (four active strain gauges, one in each arm of the bridge), but only approximate for half-bridge and quarter-bridge arrangements.
Strain gauges may be purchased as complete units, with both strain gauge elements and bridge resistors in one housing, sealed and encapsulated for protection from the elements, and equipped with mechanical fastening points for attachment to a machine or structure. Such a package is typically called a load cell.
Application & Installation
The output of a strain gage circuit is a very low-level voltage signal requiring a sensitivity of 100 microvolts or better. The low level of the signal makes it particularly susceptible to unwanted noise from other electrical devices. Capacitive coupling caused by the lead wires' running too close to AC power cables or ground currents are potential error sources in strain measurement. Other error sources may include magnetically induced voltages when the lead wires pass through variable magnetic fields, parasitic (unwanted) contact resistances of lead wires, insulation failure, and thermocouple effects at the junction of dissimilar metals. The sum of such interferences can result in significant signal degradation.
Shielding
Most electric interference and noise problems can be solved by shielding and guarding. A shield around the measurement lead wires will intercept interferences and may also reduce any errors caused by insulation degradation. Shielding also will guard the measurement from capacitive coupling. If the measurement leads are routed near electromagnetic interference sources such as transformers, twisting the leads will minimize signal degradation due to magnetic induction. By twisting the wire, the flux-induced current is inverted and the areas that the flux crosses cancel out. For industrial process applications, twisted and shielded lead wires are used almost without exception.
Guarding
Guarding the instrumentation itself is just as important as shielding the wires. A guard is a sheet-metal box surrounding the analog circuitry and is connected to the shield. If ground currents flow through the strain-gage element or its lead wires, a Wheatstone bridge circuit cannot distinguish them from the flow generated by the current source. Guarding guarantees that terminals of electrical components are at the same potential, which thereby prevents extraneous current flows.
Connecting a guard lead between the test specimen and the negative terminal of the power supply provides an additional current path around the measuring circuit. By placing a guard lead path in the path of an error-producing current, all of the elements involved (i.e., floating power supply, strain gage, all other measuring equipment) will be at the same potential as the test specimen. By using twisted and shielded lead wires and integrating DVMs with guarding, common mode noise error can virtually be eliminated.
 |
| Figure 2-10: Alternative Lead-Wire Configurations |
Lead-Wire Effects
Strain gages are sometimes mounted at a distance from the measuring equipment. This increases the possibility of errors due to temperature variations, lead desensitization, and lead-wire resistance changes. In a two-wire installation (Figure 2-10A), the two leads are in series with the strain-gage element, and any change in the lead-wire resistance (R1) will be indistinguishable from changes in the resistance of the strain gage (Rg).
To correct for lead-wire effects, an additional, third lead can be introduced to the top arm of the bridge, as shown in Figure 2-10B. In this configuration, wire C acts as a sense lead with no current flowing in it, and wires A and B are in opposite legs of the bridge. This is the minimum acceptable method of wiring strain gages to a bridge to cancel at least part of the effect of extension wire errors. Theoretically, if the lead wires to the sensor have the same nominal resistance, the same temperature coefficient, and are maintained at the same temperature, full compensation is obtained. In reality, wires are manufactured to a tolerance of about 10%, and three-wire installation does not completely eliminate two-wire errors, but it does reduce them by an order of magnitude. If further improvement is desired, four-wire and offset-compensated installations (Figures 2-10C and 2-10D) should be considered.
In two-wire installations, the error introduced by lead-wire resistance is a function of the resistance ratio R1/Rg. The lead error is usually not significant if the lead-wire resistance (R1) is small in comparison to the gage resistance (Rg), but if the lead-wire resistance exceeds 0.1% of the nominal gage resistance, this source of error becomes significant. Therefore, in industrial applications, lead-wire lengths should be minimized or eliminated by locating the transmitter directly at the sensor.
 |
| Figure 2-11: Gage-Factor Temperature Dependence |
Temperature and the Gage Factor
Strain-sensing materials, such as copper, change their internal structure at high temperatures. Temperature can alter not only the properties of a strain gage element, but also can alter the properties of the base material to which the strain gage is attached. Differences in expansion coefficients between the gage and base materials may cause dimensional changes in the sensor element.
Expansion or contraction of the strain-gage element and/or the base material introduces errors that are difficult to correct. For example, a change in the resistivity or in the temperature coefficient of resistance of the strain gage element changes the zero reference used to calibrate the unit.
The gage factor is the strain sensitivity of the sensor. The manufacturer should always supply data on the temperature sensitivity of the gage factor. Figure 2-11 shows the variation in gage factors of the various strain gage materials as a function of operating temperature. Copper-nickel alloys such as Advance have gage factors that are relatively sensitive to operating temperature variations, making them the most popular choice for strain gage materials.
 |
| Figure 2-12: Apparent Strain Variation with Temperature |
Apparent Strain
Apparent strain is any change in gage resistance that is not caused by the strain on the force element. Apparent strain is the result of the interaction of the thermal coefficient of the strain gage and the difference in expansion between the gage and the test specimen. The variation in the apparent strain of various strain-gage materials as a function of operating temperature is shown in Figure 2-12. In addition to the temperature effects, apparent strain also can change because of aging and instability of the metal and the bonding agent.
Compensation for apparent strain is necessary if the temperature varies while the strain is being measured. In most applications, the amount of error depends on the alloy used, the accuracy required, and the amount of the temperature variation. If the operating temperature of the gage and the apparent strain characteristics are known, compensation is possible.
Stability Considerations
It is desirable that the strain-gage measurement system be stable and not drift with time. In calibrated instruments, the passage of time always causes some drift and loss of calibration. The stability of bonded strain-gage transducers is inferior to that of diffused strain-gage elements. Hysteresis and creeping caused by imperfect bonding is one of the fundamental causes of instability, particularly in high operating temperature environments.
Before mounting strain-gage elements, it should be established that the stressed force detector itself is uniform and homogeneous, because any surface deformities will result in instability errors. In order to remove any residual stresses in the force detectors, they should be carefully annealed, hardened, and stress-relieved using temperature aging. A transducer that uses force-detector springs, diaphragms, or bellows should also be provided with mechanical isolation. This will protect the sensor element from external stresses caused either by the strain of mounting or by the attaching of electric conduits to the transducer.
If stable sensors are used, such as deposited thin-film element types, and if the force-detector structure is well designed, balancing and compensation resistors will be sufficient for periodic recalibration of the unit. The most stable sensors are made from platinum or other low-temperature coefficient materials. It is also important that the transducer be operated within its design limits. Otherwise, permanent calibration shifts can result. Exposing the transducer to temperatures outside its operating limits can also degrade performance. Similarly, the transducer should be protected from vibration, acceleration, and shock.
 |
| Figure 2-13: Strain Gage Installation Alternatives |
Transducer Designs
Strain gages are used to measure displacement, force, load, pressure, torque or weight. Modern strain-gage transducers usually employ a grid of four strain elements electrically connected to form a Wheatstone bridge measuring circuit.
The strain-gage sensor is one of the most widely used means of load, weight, and force detection. In Figure 2-13A, a vertical beam is subjected to a force acting on the vertical axis. As the force is applied, the support column experiences elastic deformation and changes the electrical resistance of each strain gage. By the use of a Wheatstone bridge, the value of the load can be measured. Load cells are popular weighing elements for tanks and silos and have proven accurate in many other weighing applications.
Strain gages may be bonded to cantilever springs to measure the force of bending (Figure 2-13B). The strain gages mounted on the top of the beam experience tension, while the strain gages on the bottom experience compression. The transducers are wired in a Wheatstone circuit and are used to determine the amount of force applied to the beam.
Strain-gage elements also are used widely in the design of industrial pressure transmitters. Figure 2-13C shows a bellows type pressure sensor in which the reference pressure is sealed inside the bellows on the right, while the other bellows is exposed to the process pressure. When there is a difference between the two pressures, the strain detector elements bonded to the cantilever beam measure the resulting compressive or tensile forces.
A diaphragm-type pressure transducer is created when four strain gages are attached to a diaphragm (Figure 2-13D). When the process pressure is applied to the diaphragm, the two central gage elements are subjected to tension, while the two gages at the edges are subjected to compression. The corresponding changes in resistance are a measure of the process pressure. When all of the strain gages are subjected to the same temperature, such as in this design, errors due to operating temperature variations are reduced.
Installation Diagnostics
All strain gage installations should be checked using the following steps:
1. Measure the base resistance of the unstrained strain gage after it is mounted, but before wiring is connected.
2. Check for surface contamination by measuring the isolation resistance between the gage grid and the stressed force detector specimen using an ohmmeter, if the specimen is conductive. This should be done before connecting the lead wires to the instrumentation. If the isolation resistance is under 500 megaohms, contamination is likely.
3. Check for extraneous induced voltages in the circuit by reading the voltage when the power supply to the bridge is disconnected. Bridge output voltage readings for each strain-gage channel should be nearly zero.
4. Connect the excitation power supply to the bridge and ensure both the correct voltage level and its stability.
5. Check the strain gage bond by applying pressure to the gage. The reading should be unaffected.
| References & Further Reading | |
| Omegadyne Pressure, Force, Load, Torque Databook, OMEGADYNE, Inc., 1996 | |
| The Pressure, Strain, and Force Handbook, Omega Press LLC, 1996. | |
| Instrument Engineers' Handbook, Bela Liptak, CRC Press LLC, 1995. | |
| Marks' Standard Handbook for Mechanical Engineers, 10th Edition, Eugene A. Avallone, and Theodore Baumeister, McGraw-Hill, 1996. | |
| McGraw-Hill Concise Encyclopedia of Science and Technology, McGraw-Hill, 1998. | |
| Process/Industrial Instruments and Controls Handbook, 4th Edition, Douglas M. Considine, McGraw-Hill, 1993. | |
| Van Nostrand's Scientific Encyclopedia, Douglas M. Considine and Glenn D. Considine, Van Nostrand, 1997. |
TopicTaken From : http://www.omega.com/Literature/Transactions/volume3/strain2.html
Very informative description for load cell and related arrangements. Clear description for making bridge circuits.
ReplyDeleteWith that informations i can make test for all types of strain gauge
ReplyDelete